Is your Keurig coffee maker’s blinking lights leaving you confused and frustrated? You’re not alone.
Those flashing signals are your machine’s way of telling you something’s off, but decoding the message isn’t always easy. If you want to get back to enjoying your perfect cup without the hassle, understanding what those blinking lights mean is key.
You’ll discover simple and effective steps to troubleshoot your Keurig, reset it properly, and keep it running smoothly. Stick with us, and you’ll soon turn those blinking warnings into a smooth brewing experience.
Blinking Light Patterns
The blinking light patterns on a Keurig coffee maker help you understand its status. These signals show if the machine is ready, needs attention, or has an error. Knowing these patterns saves time and avoids frustration.
Each pattern has a specific meaning. Recognizing these can guide you to fix small issues fast. It also helps in knowing when the machine is ready to brew or requires maintenance.
Common Light Signals
One common pattern is a single blinking light. This often means the machine is heating up. Another pattern is multiple lights blinking together, which usually signals an error. Some models flash the “Add Water” light when the reservoir is empty. A steady light generally means the machine is ready to brew.
What Each Pattern Means
A single blinking light often means the water is heating. Wait until it stops blinking before brewing. Multiple lights flashing can mean a general error or a need to reset the machine. The “Add Water” light blinking means the water tank is empty or not seated properly. A steady light means the coffee maker is ready for use. If the lights blink in a specific sequence, check the user manual for that model’s error codes.
Basic Troubleshooting Steps
When your Keurig coffee maker shows blinking lights, basic troubleshooting can help fix the issue fast. These steps cover simple checks anyone can do. Follow them to get your machine working again without stress.
Power Cycle Reset
Turn off the Keurig and unplug it from the power outlet. Remove the water reservoir from the machine. Plug the Keurig back in and switch it on. Wait until the “Add Water” light blinks on the display. Place the water reservoir back firmly on the machine. Run a brew cycle or just a rinse with an empty K-Cup holder. This process resets the system and often clears blinking light errors.
Checking Water Reservoir
Ensure the water reservoir has enough water to brew coffee. Sometimes the machine blinks because the reservoir is empty or not seated correctly. Remove the reservoir and check for cracks or leaks. Clean the reservoir if needed. Place it back securely so the sensors detect it properly. Proper water supply stops blinking lights caused by low or no water.
Inspecting The K-cup Holder
Open the K-Cup holder and check for any stuck or damaged pods. Remove any debris or used K-Cups that might block the holder. Clean the needles inside the holder carefully with a paperclip or brush. A blocked needle can cause blinking lights and prevent brewing. Close the holder gently until it locks. Proper care here ensures the machine reads the pod correctly.
Descale Light Issues
The descale light on your Keurig coffee maker signals the need for cleaning. This light blinks to warn about mineral build-up inside the machine. Ignoring the descale light can cause brewing problems and affect coffee taste. Addressing descale light issues ensures your Keurig works well and lasts longer.
When To Descale
Descale your Keurig when the descale light blinks. The light usually comes on after 60 brew cycles. Hard water speeds up mineral deposits inside the machine. Clean the machine every 3 to 6 months to prevent damage. Regular descaling keeps water flowing smoothly and coffee tasting fresh.
Resetting The Descale Light
Reset the descale light after you finish descaling. Different Keurig models have various reset methods. For most models, press and hold the descale button for 3 seconds. Some machines require holding the brew button instead. Check your user manual if unsure about the reset steps.
If the light stays on, unplug the machine for a minute. Plug it back in and try resetting again. Running a rinse cycle after reset helps clear any leftover residue. This process turns off the descale light and gets your Keurig ready to brew.
Advanced Reset Techniques
Advanced reset techniques offer solutions beyond simple power cycling for blinking lights on your Keurig coffee maker. These methods address deeper issues like thermal switch faults or model-specific quirks. Using these steps can help restore your machine’s function without professional repair.
Thermal Switch Reset
The thermal switch protects your Keurig from overheating. Sometimes it trips and causes blinking lights or power loss. To reset it, unplug the machine and let it cool for at least 30 minutes. This pause allows the switch to reset internally. After cooling, plug the machine back in and power it on.
If blinking lights continue, press and hold the power button for 10 seconds. Release and wait 10 seconds, then turn the machine on again. This process often clears thermal switch errors and restores normal operation.
Model-specific Reset Methods
Different Keurig models have unique reset steps. Some require button combinations to reset blinking lights or error codes. For example, the K-Elite model needs you to hold the brew button and power button simultaneously for 5 seconds.
The K-Supreme model uses a sequence of removing the water reservoir, pressing the power button, and reattaching the reservoir at specific times. Check your model’s manual for exact instructions. Following model-specific steps ensures the reset works effectively.
These advanced resets can fix persistent blinking lights and help your Keurig brew again. Keep your model’s guide handy for quick troubleshooting.
Maintenance Tips
Proper maintenance helps keep your Keurig coffee maker working well. Regular care prevents blinking lights caused by errors. Follow these simple tips to avoid common problems and enjoy smooth brewing every day.
Regular Cleaning Routine
Clean your Keurig at least once a week. Remove the water reservoir and wash it with mild soap. Wipe the machine’s exterior with a damp cloth. Clean the needle that punctures the K-Cup carefully. Use a paperclip or a small brush to clear any coffee grounds stuck inside. This stops clogs and blinking light errors.
Using Filtered Water
Use filtered or bottled water instead of tap water. Filtered water contains fewer minerals and impurities. This reduces buildup inside the machine. It also improves the taste of your coffee. Avoid water with high mineral content to prevent frequent blinking light warnings.
Preventing Mineral Build-up
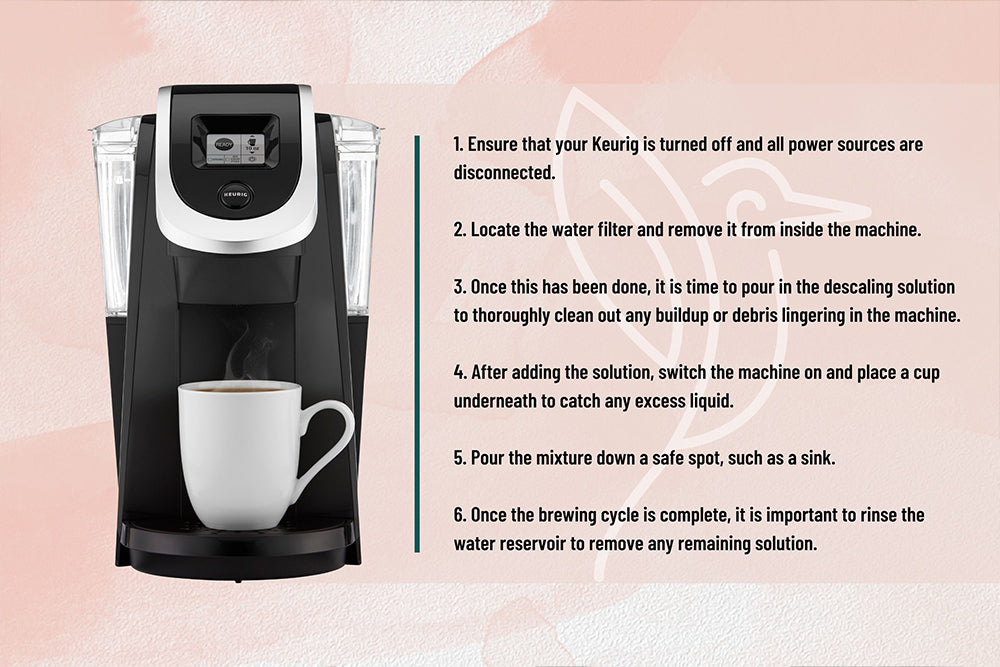
Descale your Keurig every 3 to 6 months. Use a descaling solution or white vinegar to remove mineral deposits. Fill the reservoir and run a brew cycle without a K-Cup. Repeat this process until the reservoir is empty. Then, run several cycles with clean water to rinse. This keeps your machine free from mineral buildup and blinking light issues.
Signs Your Keurig Needs Replacement
Your Keurig coffee maker may show signs it is time for a replacement. Some problems cannot be fixed by simple cleaning or troubleshooting. Noticing these signs early helps avoid wasted coffee and frustration. Paying attention to the machine’s performance saves time and money.
Here are common signals that your Keurig might need to be replaced soon.
Slow Brewing Time
If your Keurig takes much longer to brew than before, it may be failing. Slow brewing can mean the internal parts are wearing out. This delay affects your coffee routine and enjoyment. A slow machine might also overheat and cause further damage.
Weak Coffee Quality
Coffee that tastes weak or watery is a clear warning. Your Keurig may no longer extract the coffee properly. This issue often means the pump or heating element is not working well. Weak coffee lowers your satisfaction and signals the need for a new machine.
Repeated Errors Or Leaks
Frequent error messages or blinking lights show persistent issues. These errors might come from sensor failures or clogged parts. Leaks around the machine indicate seals or internal components are broken. Constant errors and leaks disrupt use and suggest replacement is needed.
Extending Your Keurig’s Lifespan
Extending the lifespan of your Keurig coffee maker protects your investment and ensures great coffee daily. Simple habits and regular maintenance keep your machine running smoothly. This section covers key tips to make your Keurig last longer.
Proper Usage Habits
Use your Keurig as the manual directs. Always place the K-Cup properly before brewing. Avoid forcing parts or using damaged pods. Turn off the machine after use to save power and reduce wear. Regular gentle handling prevents mechanical problems. Consistent use helps keep internal parts working well.
Routine Descaling
Mineral buildup clogs your Keurig and causes blinking lights. Descale the machine every three months to remove scale. Use a mixture of water and white vinegar or a commercial descaling solution. Run the solution through the brewer, then flush with clean water. This process improves coffee taste and keeps the machine healthy.
Storage And Care
Store your Keurig in a dry, cool place when not in use. Empty the water reservoir before storing for a long time. Clean the drip tray, needle, and water reservoir regularly. Wipe the exterior with a damp cloth to remove dust. Proper care prevents damage and keeps your Keurig looking new.

Helpful Resources
Troubleshooting blinking lights on your Keurig coffee maker can be simple with the right help. Many resources exist to guide you step-by-step through solutions. These tools make fixing your machine easier and faster. They offer clear instructions and advice from experts and users alike.
Below are useful resources to assist with Keurig blinking light issues. Each one provides unique support to get your coffee brewing again.
Video Tutorials
Video tutorials show exact steps to fix blinking lights on Keurig models. You can watch someone perform the reset or repair process. These videos cover common problems like power cycling, descaling resets, and internal switch fixes. Visual guides help you understand each action clearly. Watching videos reduces guesswork and prevents mistakes.
User Forums
User forums connect you with others who own Keurig machines. People share their experiences and solutions for blinking light errors. You can ask questions and get advice from real users. Forums often include tips that are not in manuals. They provide a community feeling and quick feedback from fellow coffee lovers.
Official Support
Official Keurig support offers expert help and authorized service options. Their website has detailed guides and FAQs specifically for blinking light issues. You can contact customer service by phone or email for personalized assistance. Official support ensures you get accurate and safe advice for your model. They also provide warranty and repair information.
Frequently Asked Questions
How To Fix Keurig When All Lights Are Flashing?
Unplug your Keurig and remove the water reservoir. Plug it back in and power on. Wait for the “Add Water” light to blink, then reattach the reservoir properly. Run a rinse cycle to complete the reset. This usually stops all lights from flashing.
How Do I Reset My Keurig Coffee Maker?
To reset your Keurig, turn it off and unplug it. Remove the water reservoir. Plug it back in and power on. Wait for the “Add Water” light to blink. Reattach the reservoir properly. Run a brew cycle or rinse to complete the reset.
What Is The Average Lifespan Of A Keurig?
The average Keurig lifespan ranges from 3 to 5 years. Proper maintenance and water quality extend its durability. Frequent use may reduce longevity. Replace it if brewing slows, coffee tastes weak, leaks occur, or errors persist.
How To Fix Coffee Machine Blinking Light?
Turn off and unplug the coffee machine. Remove and reattach the water reservoir securely. Plug in, power on, and run a rinse cycle. Descale the machine if the light persists. Check the manual for model-specific reset instructions.
Why Are My Keurig Coffee Maker Lights Blinking?
Blinking lights usually signal an error or maintenance need. Common causes include low water, clogged needles, or a need to descale.
Conclusion
Blinking lights on your Keurig signal a need for attention. Simple resets often solve the problem quickly. Check water levels, clean parts, and remove blockages. Regular maintenance keeps your coffee maker running smoothly. Don’t ignore warning lights; they protect your machine.
Follow easy steps to fix issues without stress. Enjoy fresh coffee with a properly working Keurig. Small efforts save time and prevent bigger repairs. Keep your mornings bright and your coffee warm.