If you’ve noticed your Noco Genius charger blinking in repair mode, you’re probably wondering what it means and if your battery can be saved. That blinking light isn’t just a random signal—it’s your charger’s way of working hard to bring your battery back to life.
But how long should it blink? When should you worry? And what steps can you take to get the best results? You’ll discover exactly what the repair mode blinking means, how to use it effectively, and what to do if things don’t go as planned.
Keep reading to take full control of your battery’s health and get your charger working right every time.
Noco Genius Repair Mode Basics
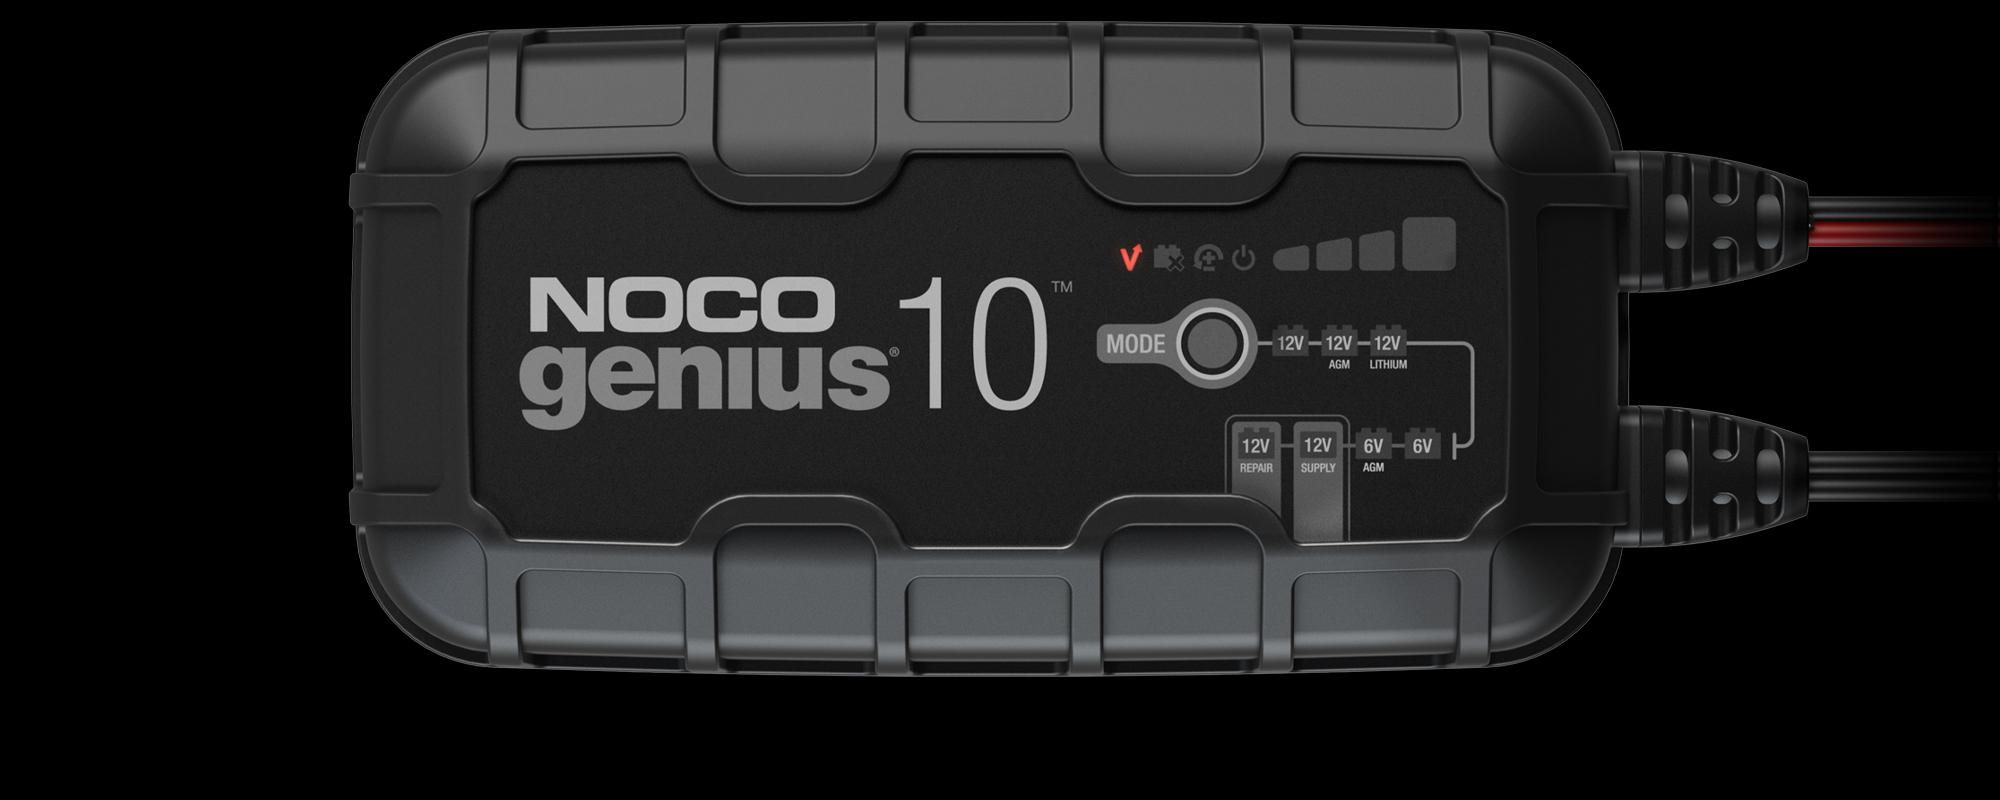
The Noco Genius charger has a special Repair Mode that helps fix damaged batteries. This mode tries to restore batteries that seem dead or weak. It is useful for batteries that do not charge normally.
Understanding how Repair Mode works helps users get the best results. The charger uses a smart process to bring batteries back to life safely. Watching the LED lights gives clues about the charging status.
How Repair Mode Works
Repair Mode uses a low current to slowly charge the battery. It monitors the battery voltage and adjusts the power output. The charger removes sulfation buildup on the battery plates.
This process can take several hours depending on battery condition. The charger stops automatically when the battery reaches a healthy voltage level. Repair Mode helps extend battery life and improves performance.
Common Led Blink Patterns
The LED light blinks red during the repair process. This means the charger is actively fixing the battery. When the light turns green, the repair is complete and the battery is ready.
Rapid blinking may signal an error like reversed polarity or a bad battery. A steady green light shows the battery is fully charged. Watching these patterns helps users know the charger’s status.
Battery Conditions That Trigger Repair
Repair Mode activates when the battery voltage is very low or dead. Batteries with sulfation or long periods of inactivity also trigger repair. The charger detects these conditions automatically.
This mode is best for lead-acid and AGM batteries that seem beyond normal charging. It will not fix batteries with severe internal damage. Repair Mode works to bring weak batteries back to usable condition.

Troubleshooting Blink Issues
The Noco Genius charger uses blinking lights to show its status. When the Repair Mode light blinks, it signals a problem that needs fixing. Understanding these blink patterns helps solve the issue fast. This section explains common reasons for blink problems and how to fix them safely.
Voltage Incompatibility Problems
The charger may blink if the battery voltage is too high or too low. Each charger supports specific voltage ranges. Using a battery outside these limits causes errors. Check the battery voltage with a meter before charging. Match the battery type and voltage to the charger settings. This step stops voltage mismatch and blinking errors.
Reversed Polarity And Connection Errors
Connecting the clamps backwards causes the charger to blink rapidly. Polarity reversal prevents proper charging and may damage the battery. Always attach the red clamp to the positive terminal and the black clamp to the negative terminal. Loose or dirty connections also trigger blinking. Clean the terminals and secure clamps firmly for a good connection.
Internal Charger Faults
Sometimes blinking signals internal faults in the charger itself. This could be from worn components or short circuits inside the unit. If the charger blinks after checking voltage and connections, unplug it and cool it down. Try using a different power outlet. Persistent blinking may mean the charger needs repair or replacement. Contact Noco support for help if unsure.
Step-by-step Repair Mode Fixes
The Noco Genius Repair Mode blinking can signal battery problems or charger issues. Following clear steps can fix this blinking and help your battery recover. Below are simple ways to handle this repair mode effectively. Each step ensures your charger and battery work well together.
These steps help you avoid errors and complete the repair process smoothly. Take your time with each step for the best results.
Fully Charging Before Repair
Begin by fully charging your battery before starting repair mode. A fully charged battery lets the charger work more efficiently. It reduces the chance of errors during repair. Use the standard charging mode until the battery reaches full power. This step prepares the battery for a proper repair cycle.
Disconnecting Battery Terminals
Turn off the charger and disconnect the battery terminals carefully. This step resets the connection between the charger and battery. Remove corrosion or dirt from the terminals to improve contact. Clean terminals help the charger detect the battery correctly. After cleaning, reconnect the terminals securely to avoid loose connections.
Starting Repair Mode Correctly
To start repair mode, connect the charger clamps to the battery terminals firmly. Press and hold the repair mode button until the LED starts blinking. The blinking red light shows the charger is working to fix the battery. Keep the charger connected without interruption during this process. Once the blinking stops and the light turns green, the repair is complete.

Advanced Tips For Battery Recovery
Advanced Tips for Battery Recovery can help extend your battery’s life. Using simple tools and regular maintenance makes a big difference. These tips improve the chances of a successful recovery with the Noco Genius charger. They also keep your battery in better shape for longer use.
Using Multimeters To Monitor Voltage
A multimeter shows your battery’s current voltage. It helps spot problems early. Connect the multimeter to the battery terminals. Check the voltage before, during, and after charging. This step ensures the battery is charging correctly. Low voltage may mean the battery needs repair or replacement.
Cleaning Battery Terminals
Dirty or corroded terminals block power flow. Use a brush or cloth to clean terminals. Remove any rust or buildup gently. Clean terminals improve electrical contact. This step helps the charger work better. Regular cleaning prevents future charging problems.
Cooling System Maintenance
Overheating can damage your battery and charger. Keep your battery’s cooling system clean and clear. Check for dust or debris around vents and fans. Proper cooling keeps the battery safe during charging. It also extends the lifespan of your battery and charger.
When Repair Mode Fails
Repair mode on the Noco Genius charger aims to restore weak or deeply discharged batteries. It uses pulses to break down sulfate crystals and bring the battery back to life. Sometimes, the repair mode blinking light shows the charger is working hard to fix the battery. But there are cases when repair mode fails to restore the battery’s function. Understanding what to do next can save time and avoid frustration.
Battery Beyond Repair
Some batteries are too damaged for repair mode to fix. This happens when internal components are broken or the battery is heavily sulfated. The charger’s blinking light may continue without progress. At this point, the battery cannot hold a charge or deliver power effectively. Trying to force repair can waste time and may damage the battery further.
Alternative Recovery Options
Other methods might recover a battery when repair mode fails. Using a desulfator can help dissolve sulfate buildup. Manual equalization charges balance the battery cells and improve performance. Testing the battery with a multimeter shows its true condition. Cleaning battery terminals and connections ensures good contact for charging. These steps can sometimes improve battery life without replacement.
When To Replace The Battery
Replace the battery if it shows no improvement after recovery attempts. Signs include low voltage, inability to hold charge, or swelling. A battery older than five years may also need replacement. Frequent repair mode blinking without success signals the end of the battery’s life. Installing a new battery ensures reliable power and safety for your devices.
Preventing Future Repair Mode Blinking
Preventing future repair mode blinking on your Noco Genius charger helps maintain battery health and charger efficiency. Understanding how to care for your battery and charger reduces errors and extends their lifespan. Follow these simple steps to avoid repeated repair mode issues and enjoy smooth charging every time.
Proper Battery Maintenance
Keep your battery clean and dry. Dirt and corrosion cause poor connections and errors. Charge the battery regularly to prevent deep discharge. Avoid letting the battery sit unused for long periods. Check battery voltage before charging. Replace old or damaged batteries promptly to avoid repair mode blinking.
Avoiding Common Connection Mistakes
Connect the clamps firmly to the correct terminals. Positive clamp to positive terminal and negative clamp to negative terminal only. Avoid loose or reversed connections; these trigger error signals. Inspect cables and clamps for damage before use. Ensure no metal objects touch the clamps during charging to prevent shorts.
Regular Charger Firmware Updates
Check for firmware updates on the official Noco website. Updated software improves charger performance and fixes bugs. Install updates as soon as they become available. Use a computer or mobile device to update the charger safely. Firmware updates reduce repair mode blinking caused by internal errors.
Frequently Asked Questions
How Long Does Noco Genius Repair Mode Take?
Noco Genius Repair Mode typically takes 12 to 24 hours to complete. It blinks red while repairing and turns green when done. Fully charge the battery before starting repair for best results.
How To Get Noco Genius Into Repair Mode?
To enter repair mode on the NOCO Genius, connect the charger to the battery, then select the Repair mode. The LED will blink red while repairing. Wait until the light turns green, indicating the process is complete. Ensure the battery is fully charged beforehand for best results.
Why Is My Noco Error Light Blinking?
The NOCO error light blinks due to battery voltage issues, reversed polarity, a dead battery, or internal charger faults. It may also blink during repair mode while attempting battery recovery. Check connections and battery condition to resolve the error.
What Are The 7 Stages Of Battery Charger Repair Mode?
The 7 stages of battery charger repair mode are: battery test, voltage check, terminal cleaning, clamp connection, voltage monitoring, clamp removal, and final system cleaning.
What Does Noco Genius Repair Mode Blinking Mean?
The blinking red light shows the charger is fixing the battery. It tries to restore battery health by removing sulfation.
Conclusion
The Noco Genius Repair Mode blinking means the charger is fixing the battery. It blinks red during the repair and turns green when done. Always charge the battery fully before starting repair mode. Check connections to avoid errors like reversed polarity or dead batteries.
Patience helps; the process can take several hours. This mode extends battery life but may not restore it fully. Regular checks keep your battery healthy and your charger working well. Understanding these signals helps you use the Noco Genius charger safely and effectively.