Are you staring at your Keurig wondering why the lights keep blinking and your coffee isn’t brewing? Those blinking lights aren’t just random—they’re trying to tell you something important about your machine’s health.
Whether it’s a simple fix or a sign that your Keurig needs some attention, understanding what those flashing lights mean can save you time, frustration, and wasted coffee. Stick with me, and you’ll learn exactly why your Keurig is blinking, how to fix it quickly, and get back to enjoying that perfect cup of coffee without any hassle.

Common Causes Of Blinking Lights
Blinking lights on a Keurig machine often signal a problem. These lights help users identify what needs attention. Understanding common causes makes fixing easier. Many issues relate to power, water, or internal parts. Below are frequent reasons for blinking lights.
Power Issues
Power problems cause many blinking light errors. Loose plugs or faulty outlets disrupt electricity flow. A damaged power cord also triggers blinking. Sometimes, the machine needs a reset by unplugging and replugging. Ensure the power source is stable and secure.
Water Reservoir Problems
The water reservoir must sit correctly on the base. If it is not placed well, lights blink as a warning. Low water levels also cause blinking alerts. Dirt or mineral build-up in the reservoir sensor can confuse the machine. Always keep the reservoir clean and filled.
K-cup Holder Errors
The K-Cup holder must close tightly during brewing. If it is loose or misaligned, blinking lights appear. A stuck or jammed holder also triggers alerts. Remove the K-Cup and check for blockages or damage. Regular cleaning keeps the holder working properly.
Heating Element Malfunctions
The heating element warms water for brewing coffee. If it fails, the machine signals with blinking lights. Overheating or internal faults cause this issue. Sometimes, descaling the machine helps restore heating function. Severe problems might need professional repair or replacement.
Basic Troubleshooting Steps
Dealing with blinking lights on your Keurig can be frustrating. Basic troubleshooting helps fix common issues fast. These steps clear simple errors and get your machine working again.
Follow each step carefully. Most problems come from power glitches, water placement, or blockages. Try these fixes before calling for help.
Performing A Power Cycle Reset
Start by turning off your Keurig. Unplug it from the wall outlet. Remove the water reservoir. Wait for about one minute. Plug the machine back in. Turn it on and wait for the lights. When the “Add Water” light blinks, place the reservoir back. Make sure it fits securely. This resets the machine’s internal systems.
Checking Water Reservoir Placement
Remove the water reservoir from the machine. Inspect the bottom for cracks or damage. Clean the reservoir’s base and the machine’s contact points. Reattach the reservoir firmly to the machine. Incorrect placement can cause blinking lights. Proper contact ensures the machine senses water correctly.
Inspecting And Cleaning The K-cup Holder
Open the K-Cup holder and remove any pod inside. Check for coffee grounds or debris. Use a damp cloth or soft brush to clean the area. Make sure the needle that punctures the pod is clear. Close the holder securely. A dirty or blocked holder may cause error lights.
Running A Rinse Brew Cycle
Place an empty mug on the drip tray. Close the K-Cup holder without a pod. Start a brew cycle using the rinse option. This flushes out any blockages inside the machine. Repeat the rinse cycle if needed. Running this cycle clears internal parts and resets sensors.
Descale Light And Maintenance
The descale light on your Keurig signals the need for cleaning inside the machine. Regular maintenance helps keep your coffee fresh and prevents damage. Ignoring this light can cause poor performance or machine breakdown.
Descaling removes mineral buildup from water inside the machine. This buildup affects heating and brewing. Following proper steps ensures your Keurig stays in good shape for a long time.
When To Descale Your Keurig
Descale your Keurig every three to six months. Frequency depends on water hardness and usage. If the descale light blinks, it means the machine needs cleaning. Delaying can cause slow brewing or weak coffee taste.
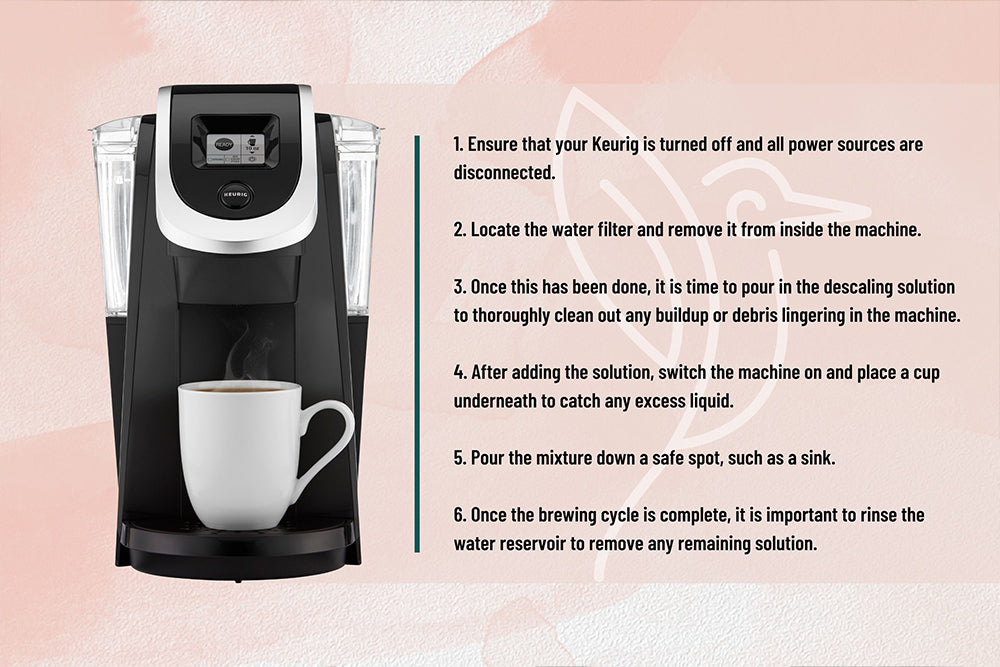
How To Descale Effectively
Use a descaling solution or white vinegar mixed with water. Fill the water reservoir with the solution. Run the brew cycle without a K-Cup until the reservoir is empty. Repeat with fresh water to rinse. Follow the instructions carefully for best results.
Resetting The Descale Light
After descaling, reset the descale light to stop blinking. Hold down the power button for about five seconds. Some models require pressing both the 8oz and 10oz buttons together. Check your Keurig manual for exact steps. Resetting confirms the machine is ready for use again.
Advanced Reset Techniques
Advanced reset techniques go beyond basic power cycling. These methods target specific parts inside your Keurig. They help fix blinking lights caused by internal errors or sensor issues. Applying these resets can save time and avoid costly repairs. Follow the steps carefully to ensure success.
Thermal Switch Reset For K-supreme
The thermal switch controls the heating element in the K-Supreme model. A stuck switch can cause blinking lights or no power. To reset it, unplug the machine and remove the water reservoir. Open the back panel carefully. Locate the small thermal switch near the heating area.
Press the switch gently to release it. Wait for 30 seconds before closing the panel. Reattach the water reservoir and plug the machine back in. Turn it on and check if the lights stop blinking. This reset often restores normal function.
Resetting The K-elite Model
The K-Elite model has a different reset process. Start by turning off and unplugging the machine. Remove the water reservoir and empty any remaining water. Press and hold the 8-ounce and 10-ounce buttons simultaneously. While holding, plug the machine back in.
Keep holding the buttons until all lights flash three times. Release the buttons and wait for the machine to reset. Refill the reservoir and run a rinse cycle. This clears many errors causing blinking lights.
Internal Component Checks
Blinking lights can signal issues with internal parts. Check the water reservoir sensor for dirt or damage. Clean the sensor gently with a soft cloth. Inspect the K-Cup holder and needle for clogs or debris. Use a paperclip to clear blockages carefully.
Look inside the machine for loose wires or burnt components. Tighten any loose connections but avoid touching sensitive parts. If problems persist, the circuit board may need professional service. Regular cleaning and inspection prevent future blinking light errors.
Extending Keurig’s Lifespan
Extending the lifespan of your Keurig machine saves money and reduces hassle. Proper care keeps the coffee maker running smoothly for years. Small habits make a big difference in performance and durability.
Using Filtered Water
Filtered water reduces mineral buildup inside the machine. Hard water causes scale, which clogs the internal parts. Using filtered water lowers the risk of damage. It also keeps your coffee tasting fresh and clean.
Regular Cleaning Tips
Clean your Keurig often to prevent blockages and buildup. Remove and wash the water reservoir weekly. Use a soft cloth to wipe the exterior. Run a descaling cycle every three months to remove mineral deposits. This keeps water flowing smoothly and lights from blinking.
Avoiding Common Wear Issues
Handle your Keurig gently to avoid broken parts. Do not force the K-Cup holder open or closed. Replace worn-out parts like the water filter regularly. Avoid overfilling the water reservoir to prevent leaks. These steps reduce mechanical problems and extend lifespan.
When To Replace Your Keurig
Knowing when to replace your Keurig can save you time and frustration. Over time, small issues may start showing signs of bigger problems. It is important to recognize these warning signs early. This helps avoid wasting coffee and money on repairs that might not work. Understanding when your Keurig is beyond repair ensures you get the best coffee experience.
Signs Of Brewing Delays
Slow brewing is a common sign your Keurig needs attention. If your machine takes longer than usual to brew, it might be struggling internally. This delay can mean the pump or heating element is failing. Sometimes, cleaning or descaling helps. But if delays persist, it may be time for a new machine.
Persistent Error Messages
Constant error messages are a clear warning sign. These messages often appear as blinking lights or codes on the display. They indicate internal faults the machine cannot fix on its own. Frequent errors disrupt your coffee routine and suggest hardware failure. When error messages do not clear after resets, replacement is the best choice.
Heating Or Pump Failures
Your Keurig’s heating and pump systems are vital for coffee brewing. If the water does not heat properly or the pump stops working, your machine fails its core function. You might notice cold coffee or no water flowing at all. Repairing these parts is often costly and complicated. Replacing the Keurig is usually more practical and reliable.
Frequently Asked Questions
How Do I Fix The Blinking Light On My Keurig?
Turn off and unplug your Keurig. Remove and reseat the water reservoir properly. Plug it back in and power on. Run a rinse cycle to reset the machine. Descale regularly to prevent blinking caused by mineral buildup.
How Do I Reset My Keurig?
To reset your Keurig, turn it off and unplug it. Remove the water reservoir. Plug it back in and power on. Wait for the “Add Water” light to blink. Reattach the reservoir properly. Run a brew cycle or rinse to complete the reset.
What Is The Average Lifespan Of A Keurig?
The average Keurig lifespan ranges from 3 to 5 years. Proper maintenance and filtered water can extend its durability.
Why Are The Lights On My Coffee Machine Flashing?
Flashing lights on your coffee machine usually indicate a need for water, a jam, or descaling. Check water levels, clear any blockages, and descale regularly to fix this issue.
Why Are The Lights Blinking On My Keurig Machine?
Blinking lights usually signal an error or maintenance need. Common causes include low water, a stuck brew head, or a clogged needle.
Conclusion
Blinking lights on your Keurig often signal a simple fix. Checking water levels, cleaning parts, or resetting the machine usually helps. Regular maintenance keeps your coffee maker working well longer. Take time to descale and remove mineral buildup. Small steps prevent bigger problems down the line.
Enjoying a fresh cup is worth the effort. Stay patient and follow these easy tips for smooth brewing. Your Keurig will thank you with every sip.